Foreword
When I moved this article from its original site in about 2007, I didn’t copy all of the images — they stayed on the original host and were eventually deleted. Update June 2026: they’ve been recovered from an old archive and are now restored.
Introduction
In December 2005 it all went horribly wrong and I feared a huge repair bill when my boiler went weird. Could I save a small fortune and fix it myself? Yes, replacing the Pressure Release Valve turned out to be pretty easy.
DISCLAIMER
I’m not a gas fitter or plumber. I don’t know very much about boilers myself, but I am generally good with mechanical things. Some of this advice could be very, very bad. All I know is that it worked for me. I accept no responsibility for any consequences of anyone following any advice on this page!
The Pressure Release Valve
The Problem
If you’re just interested in how to replace the valve, skip forward to “Opening up the Boiler”.
We had a sealed radiator system that always dropped pressure. I needed to top it up about once a month, but in December 2005 it was getting serious. Over the Xmas period I had to top it up once per day. There aren’t that many reasons for this in a central heating system, so I availed myself of the Sealed Central Heating System FAQ. Read it. Now!
Sealed CH systems have to have a pressure release valve somewhere. Usually this is actually in the boiler, there certainly is one in the WB240. The pipe from this goes straight through my wall and down to the drain, so I put a bowl over the drain to catch any water, turned the heating on and went to do other things for 1/4 of an hour or so. When I came back the pressure in the system was just under 2 bar, but there was nearly 3/8 of a pint of water in the bowl! No wonder I was having to top it up a lot!
There are two reasons this can happen.
- The pressure release valve is leaking.
- The system is genuinely over-pressure.
The latter can happen if the expansion vessel is malfunctioning. The Sealed Central Heating System FAQ which you read earlier explains this. To test whether it’s the expansion vessel or not, you will need to find it. This isn’t difficult. It’s a large red thing. Follow the instructions below about Opening the boiler up.
In my case, the pressure in the system was nowhere near 3 bar and there was plenty of charge in the expansion vessel. Ergo leaking PRV. Flushing it through wasn’t working, so it had to be replaced.
Getting a replacement PRV
There’s nowhere local I know that’s likely to stock WB spares, so I got a replacement valve from Keep The Heat On. They’re not the cheapest on the web, but their delivery is good and they’re not too far away, so a visit isn’t out of the question. The valve in question is order code 108151. WB Part 8-716-142-416-0. It arrived the next day despite me picking the 2-3 day delivery.
Opening the boiler up.
Firstly, make sure that the boiler isn’t on and hasn’t been for some time. Then isolate it electrically. Somewhere you should have some means of actually turning the boiler’s electricity supply off. This may be near the boiler or near your main electrical distribution board. It could even have its own RCD (switch) in your mains electrical distribution board. When the boiler is powered down, there should be no lights on.
The rightmost pipe going into the boiler needs to be isolated, just as a precaution.
This is the gas pipe. Turn the screw so that the slot faces across the pipe.
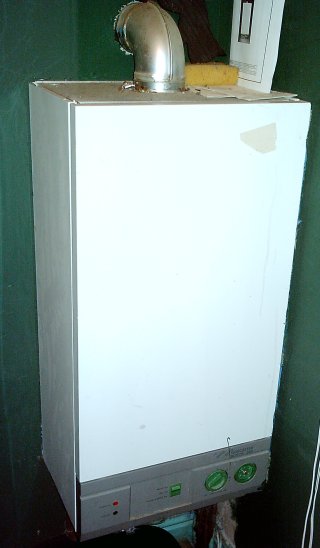
Now take the white front panel off the boiler. If you can’t figure out how to do this yourself, then you’re in trouble. Call a Registered Gas Installer!
![[picture of screw]](https://www.tomfosdick.com/wp-content/uploads/2026/06/screw.jpg)
At the top of the grey control panel are two screws. Not the ones facing you, the ones holding the grey control panel to the flanges at the side of the boiler. Supporting the grey control panel from the bottom, undo these screws. The whole control panel unit will then pull forward and hinge down. Note that the actions of pulling it forward and dropping it down are somewhat simultaneous.
The large red thing is the expansion vessel.
Testing the expansion vessel.
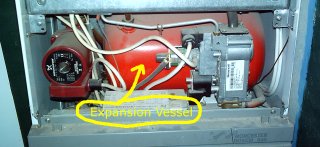
The valve for the gas charge is located on the right-hand side of the expansion vessel just above the white thing with the 4 pipes going in on the left and the drain tap on the right (I must try to work out what this is). The Sealed Central Heating System FAQ details how to test it. Mine had plenty of pressure in it.
Finding and testing the PRV

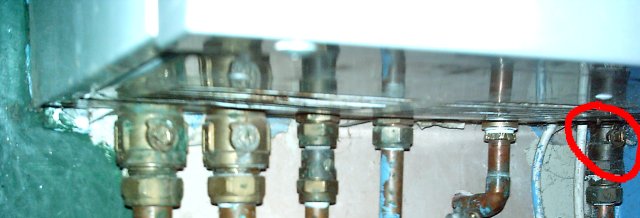
The 5th pipe from the left (2nd from the right) connects directly to the PRV.
It’s right up the back of the boiler. How convenient.
The tap is on the right-hand side and is red. With the control panel dropped, I managed to get my left hand in under the “white thing” and over the top of the PRV so that I could operate the valve.
Highlighted in the image below is the pipe that enters the bottom of the PRV. 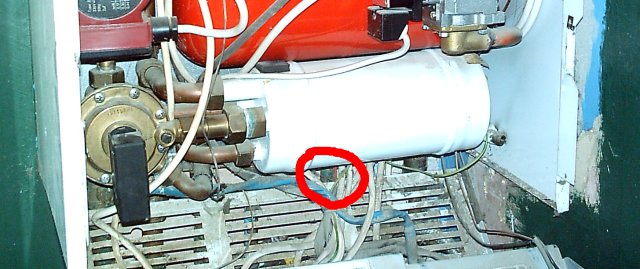
Now, if you’ve not tested a PRV before, this might take you by surprise :- they don’t turn back, only forward. Turn the top towards you; you will hear water escaping. Keep turning it the same way! Eventually it will snap back to the closed position.
If your leak doesn’t magically go away then you’re likely to need a new PRV.
Replacing the PRV: Isolating the CH and draining the boiler
I’m assuming here you have opened the boiler and dropped down the control panel (instructions for this are above).
OK, now we need to isolate the central heating circuit. Hopefully some clever spark has installed a pair of isolators other than the boiler’s own ones. If there is another pair, use them. If not, the two leftmost pipes on the boiler will have isolators on them at the bottom of the boiler. Turn them so that the screw slots face across the pipes, not along them. They may leak a bit, so beware.
If you haven’t isolated the gas, then do this now (instructions above).
You now have an isolated boiler, but it’s still full of water. Unless you plan on getting very wet whilst you’re working, draining the boiler is a good idea. To do this, just tweak the PRV so that water is flowing down the release pipe and leave it until it sounds like it’s empty.
Replacing the PRV: Spannering
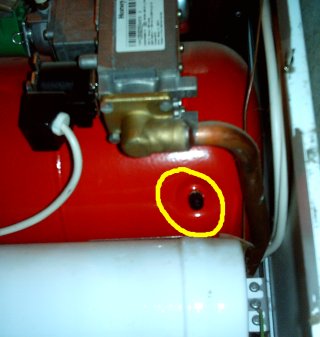
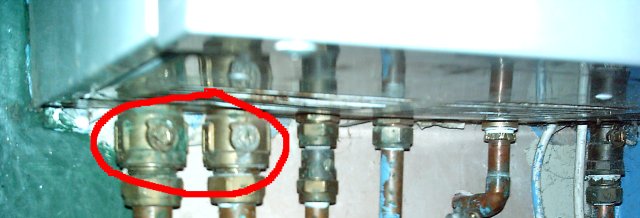
Worcester Bosch have been quite cunning here. If you look just to the left of where the water pipe enters the PRV, there is a slot cut in the panel. This exposes the nut that connects the PRV to the pipe that extends leftward.
With the control panel pulled forward but pushed up, there is just enough room to get a spanner in here and work it to loosen the nut on the PRV. Don’t do that quite yet, though! First, undo the nut that connects the PRV to the waste pipe.
OK, now undo the nut on the left of the PRV. If you’ve ever worked on a Citroen, this will be small beer to you. If not, just persevere. There’s very little room to work the spanner and you have to be very patient!
So the PRV is free! Almost. Don’t go yanking it around. It’s still connected via a thick piece of copper wire to the pressure gauge at the front of the control
panel.
Carefully ease the PRV downwards until you can get a spanner on the connector at the top. Undo this, then the PRV is really free! If you’re feeling brave, you can test it once and for all :- I turned it to make sure it was shut, covered the pressure gauge socket with my thumb and then blew through it. The problem being that I did in fact blow through it. These gauges are supposed to open at 3 bar and there is no way I can provide 3 bar of pressure with my lungs!
Now, in the style of a Haynes manual, reassembly is the reverse of disassembly, only with the new PRV, of course. I added a bit of PTFE tape to the threads. It’s probably not required and may make matters worse, although I can’t think why.
Recommissioning the boiler
DO NOT THINK YOU CAN JUST TURN THE BOILER BACK ON! The boiler will still be full of air!
It is worth mentioning here that I don’t have the official Worcester Bosch instructions for recommissioning, and I don’t know what they are. This is what I did and it worked.
Ensure that the CH circuit is no longer isolated. You will hear the boiler gurgle a bit as (some) water flows back in.
Ensure that the gas still is isolated.
Turn the electricity back on. Then cause demand from the CH system (select Heating and Hot water and then tweak the controller until the boiler attempts to fire up). Clearly the burner will not work, but everything else will. It will attempt to pump water round the system. If the pump makes a horrible noise, check its temperature.
If it becomes uncomfortable to touch, turn it off and wait until it has cooled down, then give it another few minutes.
Eventually the boiler should sound pretty much like it did before, but without the burner running, obviously.
Now turn it back off, turn the gas back on and fire it up!
If there’s still air in the heat exchanger, it may well trip the overheat protector. This is the strange little button on the top of the control panel. It should be pressed in. If it pops out, the boiler will stop. If this happens, turn off the gas and run it for a few more minutes without the gas on, then give it another go (you will need to press the reset switch in again).
Apparently there are other, better ways of getting the air out of the boiler. There is a bleed nipple on the pump; there may be one on the heat exchanger, too. Unfortunately, I don’t know anything about this! If you do (or manage to find out) then please let me know!
…. “The valve for the gas charge is located on the right hand side of the expansion vessel just above the white thing with the 4 pipes going in on the left and the drain tap on the right”
hahahaha.
Love it!
I found your site by accident, whilst searching for a Worcester 240 RSF PCB (sorry… Printed Circuit Board)
Made me laugh…. but very good too!
You should book yourself on a Gas Installers Course… I think you’d teach the instructors a thing or two! haha.
All the best,
Tom Cunningham.
(Senior Plumbing Lecturer)
NWTC.
Liverpool.
Excellent blog post 🙂 I have the same boiler and this guide has help me a few times.
Thanks 🙂
Ben V
The “white thing” (i just found out) is the heat exchanger.
http://www.uk-plumbing.com/worcester-heat-exchanger-87161205600-p-34685.html
Hi there,
Very interesting information – thanks for your efforts.
I too have this model and have an unresolved problem with it.
It will switch on and stay on at random times – no hot tap is being used at the time, yet the boiler will start up as if a hot tap is being used (and will not switch off).
Turning on a hot tap will correctly turn the boiler on, but (sometimes) after the hot tap is turned off the boiler continues to run and will not stop.
British Gas has replaced many parts on this unit, but still the problem persists.
Any advice would be greatly appreciated.
Thank you.
Hi Frustra… I can’t be of much help I’m afraid as with these things I only gain knowledge as I find problems myself and this boiler has been pretty good to me so far! I would guess that there’s a dodgy flow censor somewhere, but I wouldn’t know where to start looking for it or how to tell if it was functioning correctly or not.