I’m really bad with long term goals. I know that they’re good to have and that they give one a sense of purpose, but I’m poor at creating them awful at sticking to them.
There are two traps that I tend to fall into.
Moving the deadline backwards. This is all too easily done – if you want to achieve something “in 2 years” it’s all too tempting to retain the idea of “2 years” and forget about the start date and, more importantly, the end date.
If you’re going to achieve any sort of timed goal then you must set and stick to a deadline.
Failing to plan. Having an idea of something that you want to achieve that is a long way off is a noble thing, but you must work out how you’re going to achieve it. If you don’t then you tend to drift haphazardly doing little bits here and there that are of no real consequence.
Then there is the goal itself. Unless I can see a major benefit for me then I find it hard to get motivated about something for which I have no passion. If I set a goal then unless it’s something that I really believe in or something that is going to make a profound difference to my life I’m going to have motivational problems.
Despite the above I have a pretty good track record of achieving goals, and how I do it is really quite simple.
Step 1 is to sort the wheat from the chaff. What goals are actually important to you? A common mistake is to set goals of things you think you should achieve rather than things that you actually want to achieve. The difference can be subtle: career advice might tell you that you should be looking for a promotion in 5 years but if you like your job, if you’re earning enough to fulfil your future plans then you heart isn’t going to be in it. If you have a passion for horse-riding and you really, really want your own horse but you can’t afford it then you have a good driver to get a promotion, but the goal here is not the promotion but the horse. The promotion (or change of job) is just the means.
So now you know what you actually want to achieve don’t be tempted to put a number of years next to it, what that does is to dull the passion – it allows you to think that you’re working towards your goal when you’re not.
Instead of setting time limits start planning. What do you need to do? What do you need to do it? Break down large tasks into their component parts, things that have a definite start and a definite end so that you can tick them off.
Consider risks and alternatives. If you’re waiting for something to happen and it doesn’t, or if something goes wrong, what are you going to do? What are the alternatives? How do you mitigate the risks?
Lastly assemble the tasks into a time line – how long will it take? What slippage are you prepared to put up with? This is often a great moment, when you look down and it dawns on you that the goal is not only achievable, but achievable much, much faster than you’d anticipated.
A CV has to be carefully designed, but if it’s not designed for the correct purpose it’s no good. This is the problem with a lot of CVs – clearly a lot of care and attention has gone into them but they miss the point.
There are hundreds, probably thousands of articles out there on how to format a CV well so there’s no point in me going down that road. I’m going to approach it differently, I believe that in order to write a good curriculum vitae (or resume), you need to understand the process that it’s going to go through. Then it all becomes much, much easier.
The first thing we need to get clear is that unless you’re applying for a very niche market, your prospective employer is going to be heavily oversubscribed with applicants, many of whom have no prospect of getting the job. The net result is that it’s a waste of time for the employer to pass all the CVs to your prospective boss for consideration – they could easily outnumber the positions available by 100 to 1 and 75% or more could be rubbish. The first “paper sort” is usually done by someone from Human Resources who may have no knowledge of the job in question, merely the job description.
The first task of your CV is to get past the HR person. Thankfully this is relatively simple, but many people do it badly or even fail here when they could actually do the job.
You must make sure that you cover the basic requirements for the job and that this jumps out from the page. Don’t assume that anyone knows that experience of one technology / methodology / system includes or implies experience of another. I know someone who failed to get an interview because she listed a plethora of technical skills but failed to mention the phrase “computer literate” which was an essential for the role.
Assume the HR person has no technical knowledge and make sure the keywords on your CV match the keywords on the job specification as closely as you can justify. Doing this with qualifications, technical skills and experience is relatively easy. Some have to be worked in more carefully such as “initiative”, try to get them in though as if it’s on the job specification the HR person will be looking for it.
It’s really, really important that you get this right. Having a CV full of really great technical stuff is going to do you no good if you can’t get it past the HR people.
The CV Process - Stay Out of The Bin!
Your CV then goes to your prospective boss, or at least someone in the department. This department is recruiting so the chances are that they’re busy, meaning that time is of the essence. HR departments tend to err on the side of the false positive so the first sort is usually to get rid of people who could not in fact do the job. This is done quickly, so the clearer your CV the better. Don’t go over-the-top trying to list every piece of technology and every skill you can lay some kind of claim to in an attempt to impress your new boss. If anything that will make you look worse. Concentrate on providing evidence for what you’ve asserted. For instance, if you claim in the highlights that you’ve got 3 years of C# experience but you don’t list any previous positions involving C# development, it’s not going to look good.
Now you’re on the short-list. The person calling the shots is now probably looking at the set of CVs and thinking about either pulling out a few of the best or eliminating some of the worst. Fortunately for the good CV writer it’s not a level playing field. If your CV is easy to read your propensity to stay out of the bin will be greater. If you have a wordy CV that’s hard to read it may end up in the bin on those grounds alone. Similarly mistakes or inconsistencies on your CV can land you in the bin. Technical positions require the ability to communicate clearly and effectively and to show good attention to detail. If your CV doesn’t demonstrate these traits then it’s a good excuse for it to be thrown in the bin.
When I explain this to people I get a few slightly surprised reactions at this point – do employers really throw CVs in the bin simply because they’re too long or they don’t like the style? It can happen. If you’re comparing two CVs that seem to show individuals of similar suitability for the job but you can only interview one, you have to make a decision somehow. The quality of the CV can reveal a lot about the personality and attitude of the person.
Another piece of very useful inside information is that the actual goal of the recruitment is not necessarily to employ the person that matches the job description best. It’s to employ someone who’s going to be good at the job and is going to work well with the existing people in the team. Your CV should demonstrate some personality, there is width for creativity. Don’t go mad with crazy fonts, that will be counter-productive, but try to introduce a hint of your personality into it.
Something that I think very little attention is paid to and that can land your CV in the bin is the inclusion of material that reflects negatively on the applicant. Think about what the company is asking for and if there’s anything on your CV that contradicts that then remove it or if you can’t, play it down. It’s worth mentioning that opinions are almost always a bad idea. Their negative points exceed the positive. If you’re going to link a blog, profile or web site then think carefully about its contents and how it reflects on you. If you express a lot of left wing sentiment on your blog for instance, your prospective new employer may not appreciate this.
Finally, although many disagree apparently, I like to see a “Hobbies and Interests” section. It should be every brief, though, perhaps as terse as just a list of 5 words. If for nothing else, it’s useful to provide the employer with an ice-breaker in the interview.
If you take nothing else away from this article, remember these two things;
You must demonstrate that you meet the job specification
Your CV must be clear and easily read by a non-technical HR person and a hassled potential new boss
Silverstone‘s new section is fantastic and the view from what’s now called Village grandstand (was called Arena) is excellent.
We dropped in there for one of the GP2 races and since it was new I thought a panorama shot might be useful for anyone considering it. Unfortunately I didn’t quite line the photos up so it doesn’t stitch together properly. So there are two, the left half and the right half.
In the left half you get a bonus in that you can see the cars go through Maggotts / Becketts / Chapel and onto the Hangar Straight as well as Village / The Loop / Aintree.
Left Hand Side of the View from Village (click for bigger)The Right Hand Side of the view from Village B (click for bigger)
There’s a really good overtaking opportunity if you can get a good run round the outside at Village because you’ll have the inside at The Loop. This is a very bad line for the corner and you’ll run wide on the exit, but it’s seriously difficult for your opponent to duck inside – we saw a couple of people making this stick in the GP2. A lot of people were running too wide out of Village, too, meaning more excitement at The Loop.
A word to the wise, though. The grandstand is quite exposed to wind, so make sure that you have some form of wind-proof clothing option with you because even when it was 25C in the sun it was cold up there.
We change. We move on. It’s part of being human.
There’s a lot of change going on with me at the moment and it’s at times like this when a little wisdom can make a big difference.
One of the most effective pieces of advice I’ve ever been given was from a Kung-Fu instructor. She asked me which tree was stronger, the willow or the oak.
The oak is a potent symbol of power, it stands strong against the wind, assenting only to the gentlest of sways whereas the willow flops around all over the place in the merest breeze. The oak will still stand strong in a storm while the willow is battered into the ground.
When the wind gets too strong though, the oak will snap. When the wind subsides the oak will lie broken on the ground and the willow will return to its original form, swaying gently in the breeze.
The skill is knowing when to be the oak and when the forces against you are all too strong. I naturally tend toward the oakish, so I have to keep asking myself if I’m trying to be too strong, if perhaps I should stop pushing and just weather the storm. An ability to recognise when a something is beyond my control, to accept it rather than exhaust myself fighting against it (and probably lose anyway) has saved my bacon many, many times.
This goes hand in hand with another important skill – the ability to seek advantage even in adverse circumstances. When something bad happens it’s all too easy to concentrate on the bad, on what will be lost. A little bit of objective thinking often reveals that whilst some doors are closing others are opening. Sometimes an apparently bad change, on proper analysis, works out to be positive overall.
Lastly, and leading directly from the above, it’s easier to influence something that you’re on board with. If you diametrically oppose something you are likely to find that you become marginalised and are ignored. If you align yourself with it but suggest changes, you are more likely to be listened to.
Take these three together and you can remove a great deal of hassle from your life.
When it comes to hardware, technical staff can badger a business senseless. Every member of technical staff claims that they could do their job so much better if they just had this upgrade or that gizmo. Without spending hours reading all the latest hardware blogs, determining what would actually be useful investment in their productivity is next to impossible.
SSD drives are a no-brainer though. The biggest bottleneck in PCs today is the hard disk, clunky, mechanical things that lose an awful lot of time whilst the heads are whizzing back and forth across the platters.
At the time of writing a 64Gb SSD Drive is about £100. I bought one more out of curiosity than anything else and slung it in my ancient 3.0GHz P4.
This video shows it loading Windows XP, logging in, then starting Word and Chrome at the same time.
I then type some rubbish in Word, navigate to Facebook and shut the PC down. The difference an SSD Drive makes is mind-bending. I’m not saying that you should replace existing hard disks with SSD drives, just slap one in with the operating system and apps on and use the old (likely much larger capacity) drive for data. That’s good business sense.
When I moved this article from its original site in about 2007, I didn’t copy all of the images — they stayed on the original host and were eventually deleted. Update June 2026: they’ve been recovered from an old archive and are now restored.
Introduction
In December 2005 it all went horribly wrong and I feared a huge repair bill when my boiler went weird. Could I save a small fortune and fix it myself? Yes, replacing the Pressure Release Valve turned out to be pretty easy.
DISCLAIMER
I’m not a gas fitter or plumber. I don’t know very much about boilers myself, but I am generally good with mechanical things. Some of this advice could be very, very bad. All I know is that it worked for me. I accept no responsibility for any consequences of anyone following any advice on this page!
The Pressure Release Valve
The Problem
If you’re just interested in how to replace the valve, skip forward to “Opening up the Boiler”.
We had a sealed radiator system that always dropped pressure. I needed to top it up about once a month, but in December 2005 it was getting serious. Over the Xmas period I had to top it up once per day. There aren’t that many reasons for this in a central heating system, so I availed myself of the Sealed Central Heating System FAQ. Read it. Now!
Sealed CH systems have to have a pressure release valve somewhere. Usually this is actually in the boiler, there certainly is one in the WB240. The pipe from this goes straight through my wall and down to the drain, so I put a bowl over the drain to catch any water, turned the heating on and went to do other things for 1/4 of an hour or so. When I came back the pressure in the system was just under 2 bar, but there was nearly 3/8 of a pint of water in the bowl! No wonder I was having to top it up a lot!
There are two reasons this can happen.
The pressure release valve is leaking.
The system is genuinely over-pressure.
The latter can happen if the expansion vessel is malfunctioning. The Sealed Central Heating System FAQ which you read earlier explains this. To test whether it’s the expansion vessel or not, you will need to find it. This isn’t difficult. It’s a large red thing. Follow the instructions below about Opening the boiler up.
In my case, the pressure in the system was nowhere near 3 bar and there was plenty of charge in the expansion vessel. Ergo leaking PRV. Flushing it through wasn’t working, so it had to be replaced.
Getting a replacement PRV
There’s nowhere local I know that’s likely to stock WB spares, so I got a replacement valve from Keep The Heat On. They’re not the cheapest on the web, but their delivery is good and they’re not too far away, so a visit isn’t out of the question. The valve in question is order code 108151. WB Part 8-716-142-416-0. It arrived the next day despite me picking the 2-3 day delivery.
Opening the boiler up.
Firstly, make sure that the boiler isn’t on and hasn’t been for some time. Then isolate it electrically. Somewhere you should have some means of actually turning the boiler’s electricity supply off. This may be near the boiler or near your main electrical distribution board. It could even have its own RCD (switch) in your mains electrical distribution board. When the boiler is powered down, there should be no lights on.
The rightmost pipe going into the boiler needs to be isolated, just as a precaution. This is the gas pipe. Turn the screw so that the slot faces across the pipe.
Now take the white front panel off the boiler. If you can’t figure out how to do this yourself, then you’re in trouble. Call a Registered Gas Installer!
At the top of the grey control panel are two screws. Not the ones facing you, the ones holding the grey control panel to the flanges at the side of the boiler. Supporting the grey control panel from the bottom, undo these screws. The whole control panel unit will then pull forward and hinge down. Note that the actions of pulling it forward and dropping it down are somewhat simultaneous.
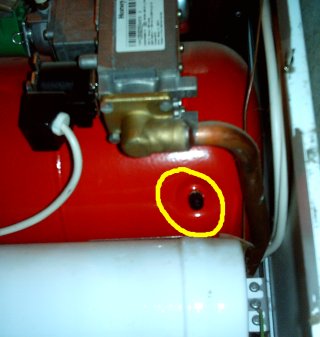
The large red thing is the expansion vessel.
Testing the expansion vessel.
The valve for the gas charge is located on the right-hand side of the expansion vessel just above the white thing with the 4 pipes going in on the left and the drain tap on the right (I must try to work out what this is). The Sealed Central Heating System FAQ details how to test it. Mine had plenty of pressure in it.
Finding and testing the PRV
The 5th pipe from the left (2nd from the right) connects directly to the PRV. It’s right up the back of the boiler. How convenient.
The tap is on the right-hand side and is red. With the control panel dropped, I managed to get my left hand in under the “white thing” and over the top of the PRV so that I could operate the valve.
Highlighted in the image below is the pipe that enters the bottom of the PRV.
Now, if you’ve not tested a PRV before, this might take you by surprise :- they don’t turn back, only forward. Turn the top towards you; you will hear water escaping. Keep turning it the same way! Eventually it will snap back to the closed position.
If your leak doesn’t magically go away then you’re likely to need a new PRV.
Replacing the PRV: Isolating the CH and draining the boiler
I’m assuming here you have opened the boiler and dropped down the control panel (instructions for this are above).
OK, now we need to isolate the central heating circuit. Hopefully some clever spark has installed a pair of isolators other than the boiler’s own ones. If there is another pair, use them. If not, the two leftmost pipes on the boiler will have isolators on them at the bottom of the boiler. Turn them so that the screw slots face across the pipes, not along them. They may leak a bit, so beware.
If you haven’t isolated the gas, then do this now (instructions above).
You now have an isolated boiler, but it’s still full of water. Unless you plan on getting very wet whilst you’re working, draining the boiler is a good idea. To do this, just tweak the PRV so that water is flowing down the release pipe and leave it until it sounds like it’s empty.
Replacing the PRV: Spannering
Worcester Bosch have been quite cunning here. If you look just to the left of where the water pipe enters the PRV, there is a slot cut in the panel. This exposes the nut that connects the PRV to the pipe that extends leftward.
With the control panel pulled forward but pushed up, there is just enough room to get a spanner in here and work it to loosen the nut on the PRV. Don’t do that quite yet, though! First, undo the nut that connects the PRV to the waste pipe.
OK, now undo the nut on the left of the PRV. If you’ve ever worked on a Citroen, this will be small beer to you. If not, just persevere. There’s very little room to work the spanner and you have to be very patient!
So the PRV is free! Almost. Don’t go yanking it around. It’s still connected via a thick piece of copper wire to the pressure gauge at the front of the control panel.
Carefully ease the PRV downwards until you can get a spanner on the connector at the top. Undo this, then the PRV is really free! If you’re feeling brave, you can test it once and for all :- I turned it to make sure it was shut, covered the pressure gauge socket with my thumb and then blew through it. The problem being that I did in fact blow through it. These gauges are supposed to open at 3 bar and there is no way I can provide 3 bar of pressure with my lungs!
Now, in the style of a Haynes manual, reassembly is the reverse of disassembly, only with the new PRV, of course. I added a bit of PTFE tape to the threads. It’s probably not required and may make matters worse, although I can’t think why.
Recommissioning the boiler
DO NOT THINK YOU CAN JUST TURN THE BOILER BACK ON! The boiler will still be full of air!
It is worth mentioning here that I don’t have the official Worcester Bosch instructions for recommissioning, and I don’t know what they are. This is what I did and it worked.
Ensure that the CH circuit is no longer isolated. You will hear the boiler gurgle a bit as (some) water flows back in.
Ensure that the gas still is isolated.
Turn the electricity back on. Then cause demand from the CH system (select Heating and Hot water and then tweak the controller until the boiler attempts to fire up). Clearly the burner will not work, but everything else will. It will attempt to pump water round the system. If the pump makes a horrible noise, check its temperature. If it becomes uncomfortable to touch, turn it off and wait until it has cooled down, then give it another few minutes. Eventually the boiler should sound pretty much like it did before, but without the burner running, obviously.
Now turn it back off, turn the gas back on and fire it up!
If there’s still air in the heat exchanger, it may well trip the overheat protector. This is the strange little button on the top of the control panel. It should be pressed in. If it pops out, the boiler will stop. If this happens, turn off the gas and run it for a few more minutes without the gas on, then give it another go (you will need to press the reset switch in again).
Apparently there are other, better ways of getting the air out of the boiler. There is a bleed nipple on the pump; there may be one on the heat exchanger, too. Unfortunately, I don’t know anything about this! If you do (or manage to find out) then please let me know!
A little note: this article was written in 2010 – the principles of a semaphore haven’t changed in decades, but the code included is somewhat out of date now.
No, you’ll be glad to hear that Semaphores in computing don’t involve standing in a prominent position and waving your arms around like a lunatic. Semaphores are handy little constructs that are especially of use in producer / consumer scenarios; indeed, this is by far the easiest way of explaining them. I find imagining the semaphore to be a person, a supervisor, to be the best way of visualising it. Every time one of the producers has some work, it hands it to the supervisor. If there are no workers (consumers) waiting for work, the supervisor stores it until such time as one asks for more. The important thing about a semaphore is that if there are no work items, the supervisor makes the workers wait.
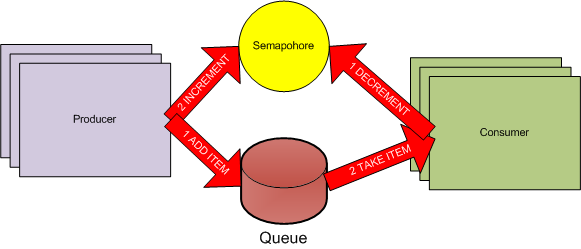
So, to the semaphore itself – they act most like accumulators: you increment and decrement them. Worker threads (consumers) try to decrement the semaphore. If the semaphore is already at zero and a thread tries to decrement it, that thread will wait. Producers increment the semaphore. It’s important to note that if multiple threads are waiting on a semaphore and the semaphore is then incremented by one, only one thread will be released. The rest will remain waiting. There’s a more real-world example in the diagram beneath…
Semaphore and Queue
In said diagram, there are several producers. When a producer has an item, it always follows a strict sequence: it adds the item to the queue and then increments the semaphore. The consumer threads do the reverse: they know that if they can decrement the semaphore, they can safely take an item from the queue. Of course, if the semaphore drops to zero, then consumer threads will have to wait until a producer increments the semaphore. At this time, one consumer thread will be released to process the added work item. There’s an example of this in action in this zip file (C#, VS2008), extract beneath.
static void Consumer()
{
    string item;
    int queueLength;
    do
    {
        mySemaphore.WaitOne(); // wait for an item to be available
        lock (myQueue) // queue isn't thread safe so we need to lock.
        {
            item = myQueue.Dequeue();
            queueLength = myQueue.Count;
        }
        if (!String.IsNullOrEmpty(item))
            Console.WriteLine(String.Format("C{0:00} DEQUEUE Q{1:00}: {2}",
        Thread.CurrentThread.ManagedThreadId, queueLength, item));
        Thread.Sleep(250);
    } while (!String.IsNullOrEmpty(item)); //we use null to signify end of processing
}

static void Producer()
{
    int queueLength;
    foreach (string line in Shelley)
    {
        Thread.Sleep(random.Next(1000));
        lock(myQueue) //queue isn't thread safe so we need to lock.
        {
            myQueue.Enqueue(line);
            queueLength = myQueue.Count;
        }
        mySemaphore.Release(); //let any waiting consumers go.
        Console.WriteLine(String.Format("p{0:00} enqueue Q{1:00}: {2} ",
        Thread.CurrentThread.ManagedThreadId, queueLength, line));
    }
}
Without semaphores, ensuring that the producer / consumer model works efficiently tends to become either very complex or inefficient.
That’s really all there is to say about semaphores, apart from the fact that you shouldn’t limit your thinking about them to producer / consumer scenarios; they can actually come in surprisingly handy elsewhere.
Message Passing
Message passing is massively important in most of today’s GUI applications, yet it’s surprising the number of people who have no real idea what it’s about. In order to understand message passing, though, you really need a basic understanding of what a thread actually is. It’s a procedure. Regardless of wrappers etc., when you create a thread what you actually say to the scheduler is “take this block of code and execute it in parallel with everything else I’m doing”. If you look at the code above, you’ll notice two static methods; Producer and Consumer. These form the code block for threads – 2 copies of Producer and 3 of Consumer are run at the same time. If they were a straight block of code, execution would fall off the end and the thread would end. Both, however, loop until some condition is met, when they stop.
It’s important, if you do use loops in threads, that there is some end condition so that they can stop when the program ends.
The main thread in the majority of GUI applications is exactly like this :- it actually runs a simple loop that waits for messages. When it gets a message, it performs some sort of action (usually calling a handler) and then returns to waiting for the next message. In this context, a message is likely to be a mouse click, a key press or an instruction to minimise and these come from the operating system, but it could equally well be an instruction that we generate ourselves.
Why do we do it? Well, in the case of most GUI apps it ensures that everything that happens to the GUI happens in one thread. If the handlers are well-written, then every action starts with the GUI in a stable position and finishes leaving the GUI in a stable position.
We can look at it as a transaction processing system: transactions (messages) are serialised on the queue and each one is executed discretely.
All we need to do this ourselves is a thread that loops on some sort of queue, waiting for a message to arrive and some sort of message structure for it to process. This is an extremely powerful technique, but it isn’t without its hazards. As much as it can be used to aide thread safety by ensuring that access to data and resources is correctly sequenced, it can just as easily ruin thread safety, particularly as the exact time when a message is going to be processed cannot be known, therefore the lifetime and access to any data shared between threads must be very carefully considered.
Windows itself provides a standard framework for message passing that contains two fundamental ways of passing a message – PostMessage and SendMessage. No, the names are not brilliant. PostMessage puts a message on the queue for the message processing thread and continues running. SendMessage by comparison puts a message on the queue for the message processing thread and then blocks the calling thread until the message has been processed.
In WPF we can look at the Dispatcher framework – that’s an easier to use version of the same thing.
If, before I mentioned that last bit, you hadn’t realised that Message Passing opens up a whole new world of pain when it comes to deadlocking, you should now. Imagine what happens if a handler in thread A does a SendMessage to thread B, which then tries to lock a resource that thread A has locked.
If you’re programming with message passing it’s more important than ever to ensure what state your data is in at any moment and what has access to it, but you must also keep on top of flow and make sure that deadlock situations can’t arise.
OK, I suspect I’m a little bit of a nerd about this, but I actually find it quite fun to look at designs and work out where the deadlocks can happen, but it’s from years of playing about with this that I understand exactly what is likely to happen and why.
Next time I’ll start looking at how the constructs provided in C# and the .NET Framework 3.5 help us with threading.
Here’s a really crafty use of the .Aggregate function of C#’s LINQ.
x = IQueryableOfSomething.Select(n => n.ToString()).Aggregate((p, q) => p + ", " + q));
It produces a comma separated list of the items in IQueryableOfSomething. So if it were a list of colours one might get:
Red, Green, Orange, Blue
The cunning thing about it is that there are only separators between the items, there isn’t an extra one at the end. Coping with this in inline code always makes it look pants. This is much cooler.
[ EDITS ]
Having initially posted this an “anonymous coward” pointed out that in the initial case one can use String.Join. This is true but my point really wasn’t specific to this instance. The idea was to start thinking outside the bounds of the normal boring aggregate operations. It’s a much more useful feature than just sums and averages. e.g.
What does this do? It creates a one byte checksum for an IEnumerable<byte>. Checksums are really useful if the storage or transport you’re using is not 100% reliable – you send / store the data with its checksum.
When you read it back you calculate the checksum again. If it doesn’t match the one stored / sent with the data then there’s been a corruption (either in the data or the checksum).
Of course this only uses a byte so there’s a 1:255 chance that the data is corrupt but the checksum is correct nonetheless. There are many ways of creating checksums less prone being randomly correct despite the data being corrupt. One has to weigh up the severity of this eventuality against the computational and space / transport cost of more resilient options.
Reading Time: < 1minuteHull University's Rob Miles on the Tech Ed Banner
Useless trivia and because there’s no way that Rob is going to put this on his own blog….
If, before it had taken place, you visited Microsoft’s Tech Ed North America’s site for 2010 you’d have seen the above banner (in full). The person I’ve highlighted is my colleague at The University of Hull, Rob Miles.
Reading Time: 4minutesSo last time I left you with the horror of deadlocks. To recap, a deadlock is when two (or more) threads can’t continue because there’s no way that they can get the resources that they need. A simple deadlock can occur when two threads, let’s call them A and B, both require access to two locks, but lock them in different orders.
Thread A locks resource 1
Thread B locks resource 2
Thread A tries to get a lock on resource 2 but can’t until Thread B unlocks it
Thread B tries to get a lock on resource 1 but can’t until Thread A unlocks it.
Stage 4 of the above can never succeed because Thread A is waiting for Thread B already. They’re mutually locked out, or deadlocked.
One of the easiest things to say about avoiding deadlocks is that you should always lock the resources in the same order. This will indeed prevent deadlocks and it works really well in simple little examples, but when you’re elbows deep in a myriad of objects and there’s all sorts of stuff flying around it can be difficult to ensure that this actually happens. That doesn’t mean abandon the idea, indeed I would suggest attempting to make sure that it’s the case anyway, but it’s not always practical to ensure.
Let’s look at the savings and current account example again. This is how it was…
BankAccount currentAccount;
BankAccount savingsaccount;

void moveFromSavingsToCurrent(int amount)
{
    //we need to work with savings, so lock it
    lock(savingsAccount)
    {
        if(savingsAccount.Total>amount)
        {
            //we can proceed, but we don't want any inconsistencies so we now need
            //to lock currentAccount
            lock(currentAccount)
            {
                savingsAccount -= amount;
                currentAccount += amount;
            }
        }
    }
}

void moveFromCurrentToSavings(int amount)
{
    //we need to work with current, so lock it
    lock(currentAccount)
    {
        if(currentAccount.Total>amount)
        {
            //we can proceed, but we don't want any inconsistencies so we now need
            //to lock savingsAccount
            lock(savingsAccount)
            {
                currentAccount -= amount;
                savingsAccount += amount;
            }
        }
    }
}
We can actually fix this one really easily.
BankAccount currentAccount;
BankAccount savingsaccount;

void moveFromSavingsToCurrent(int amount)
{
    //we need to work with savings, so lock it
    lock(savingsAccount)
    {
        lock(currentAccount)
        {
            if(savingsAccount.Total>amount)
            {
                savingsAccount -= amount;
                currentAccount += amount;
            }
        }
    }
}

void moveFromCurrentToSavings(int amount)
{
    //we need to work with current, so lock it
    lock(savingsAccount)
    {
        lock(currentAccount)
        {
            if(currentAccount.Total>amount)
            {
                currentAccount -= amount;
                savingsAccount += amount;
            }
        }
    }
}
By taking the two locks out every time and always in the same order we prevent the deadlock, but now we’re always having to perform both locks, which will be a performance hit. Is there a better way?
Possibly, if we always need to lock both for every operation that we do then we could simply use one lock instead. In fact, simplifying the locking strategy is a great way to reduce the possibility of deadlocks and done well can actually improve performance. After all, the more locks there are, the more chance of a deadlock.
Another trick is to test locks, either with or without a timeout. In order to do this we need to move away from the simple lockstatement and explicitly use a mutex or similar). In doing so we break out of the simple c# constructs into the world where we must know what we or doing, or it will hurt us.
Mutex m = new Mutex();
...
m.WaitOne();

try
{
access the required resources...
}
finally
{
m.ReleaseMutex();
}
Here’s the simple construct to using a Mutex. It’s an object in c# so we need to create it. We then call WaitOne() on it when we need to get the lock and we call ReleaseMutex() when we’re done. It’s always good to try to do this in a try…finally because the number of times a Mutexis acquired (with WaitOne()) must match the number of times it’s released (ReleaseMutex()). This may sound silly, but a thread can actually acquire a Mutex more than once, for instance in a recursive function. If an instance of that function threw an exception, it could leave the Mutex with more acquisitions than releases, which would be a problem and would cause an exception to be thrown when another thread attempted to acquire it. A thread must exit leaving all Mutex releases and acquisitions balanced.
Apart from that, it’s just like a lock. Our personal finance example again…
So what about this waiting for a timeout business? Well there are several overloads of WaitOne() which basically allow you to specify some sort of timeout. WaitOne() then returns a boolean, if the wait is succesful and the Mutex is acquired, WaitOne() will return true. If it fails and times out, WaitOne() will return false. Note that although you can use this to get you out of a deadlock, it’s a bit of a hack. Programming it properly in the first place is a better idea. In fact, the amount of error handling code that’s required to avoid nasty consequences may well be greater than the amount of code required to make it work properly in the first place.
I mentioned in my last also also that there is the phenomenon of the compound deadlock. This is the one that really gets programmers frustrated because a simple deadlock like the one in our savings account example is relatively easy to spot. In reality deadlocks can be long chains of events, the chances of which happening can be millions to one. Code that has run fine for years can suddenly start deadlocking one one machine. Why? Something very subtle with the timing has changed. Maybe an operating system change, maybe a new piece of hardware that just happens to cause the particular sequence of events in the particular order at the particular times. The worst thing is that there’s no stack trace, no debug. Often it can’t even be made to do it in the debug environment, the only place it will do it is at the customer site.
Nest time I’ll talk about semaphores and I may even get on to semaphores.
By the way, I’m intending to tidy these articles up, provide more examples and link them together a bit later.


![[picture of screw]](https://www.tomfosdick.com/wp-content/uploads/2026/06/screw.jpg)